
Laser plastic welding (LPW) has evolved from a niche technology to the industry standard for applications requiring hermetic seals, particulate-free cleanliness, and zero mechanical stress. For engineers in the medical device and automotive electronics sectors, understanding the physics, process variants, and economic trade-offs of this technology is essential for scaling production.
This guide moves beyond basic definitions to cover the operational realities of laser transmission welding—from 2-micron clear-to-clear bonding to calculating Total Cost of Ownership (TCO).
How Laser Plastic Welding Works
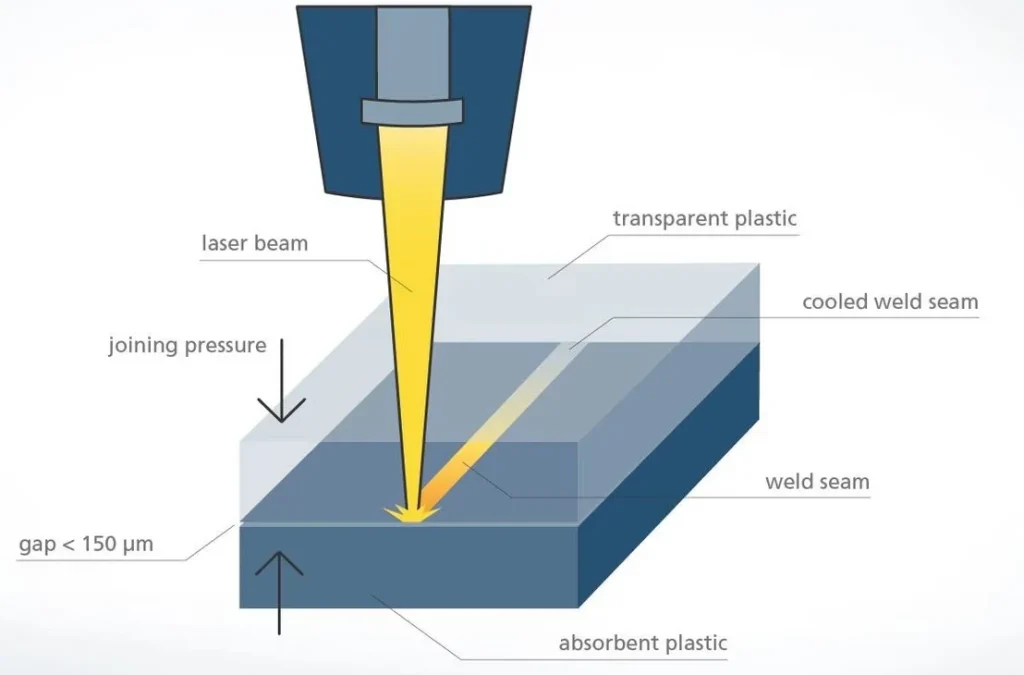
At its core, the fundamental principles of laser transmission welding (TTIr) rely on a “transmissive-to-absorbing” stack-up. Unlike friction-based methods that generate heat through vibration, LPW uses photonics to generate heat volumetrically at the joint interface.
The 3 Critical Requirements
For a successful weld, three physical conditions must be met:
- Optical Compatibility: The upper part must be transmissive to the laser wavelength (typically Near-Infrared or NIR, 800–1100 nm). The lower part must be absorptive, often using additives like Carbon Black (0.2%–0.4% volume) to convert photons into heat.1
- Intimate Contact (The Zero-Gap Rule): Laser welding relies on thermal conduction. If there is an air gap >0.05 mm, heat cannot transfer from the absorbing lower part to the transmissive upper part. The lower part will burn, and the upper part will remain cold.
- Clamping Pressure: Uniform pressure (typically 2–10 bar) is required not just to hold parts, but to facilitate heat transfer and ensure the parts fuse as the material expands and melts.
Engineering Note: “Transmissive” does not mean “transparent to the eye.” Many black plastics are colored with IR-transparent dyes, allowing them to look black but let laser light pass through.
The 4 Main Process Variants
Selecting the right laser delivery method is a trade-off between cycle time, flexibility, and tooling cost.
| Process Variant | Mechanism | Best For | Cycle Time |
| Contour Welding | A robot or gantry moves the laser spot along the weld path. | Large, 3D parts (e.g., auto taillights, tanks). | Slow (seconds to minutes) |
| Quasi-Simultaneous (Galvo) | High-speed mirrors steer the beam around the path 50+ times/sec. Heats the whole seam effectively at once. | Electronics housings, medical sensors. Bridges small gaps well. | Fast (< 2-5 sec) |
| Simultaneous Welding | High-power diode arrays fire on the entire seam geometry instantly. | High-volume mass production (e.g., microfluidics). | Extremely Fast (< 1 sec) |
| Mask Welding | A laser “curtain” sweeps over a physical mask, exposing only the weld pattern. | Micro-channels (<100µm) in medical chips. | Fast, high precision |
Material Compatibility & The “Clear-to-Clear” Challenge
A common friction point in design is material selection. Chemical compatibility follows the “like-likes-like” rule—polymers must have similar melting points and solubility parameters.
Standard Compatibility Matrix
- Excellent: ABS to ABS, PC to PC, PMMA to PC (blends).
- Poor/Impossible: PA (Nylon) to PE/PP (chemically incompatible without tie-layers).
The 2-Micron Revolution (Clear-to-Clear)
Traditionally, welding two clear medical parts was impossible without adding expensive IR-absorbing clear liquid additives.
The Solution: Lasers operating at 2 microns (approx. 2000 nm) leverage the intrinsic absorption of C-H bonds in polymers.
- How it works: The plastic naturally absorbs about 15-30% of the energy per millimeter. By focusing the beam tightly at the interface, you can melt the joint without additives.
- Application: Ideal for microfluidics and catheters where biocompatibility is paramount and additives are banned.
Comparison: Laser Welding vs. Ultrasonic Welding
This is the primary “fork in the road” for process engineers.
| Feature | Laser Plastic Welding | Ultrasonic Welding |
| Mechanical Stress | Zero. Non-contact. Safe for sensitive PCBs/sensors. | High. Vibration can dislodge components or damage wire bonds. |
| Cleanliness | Class A / Sterile. No particulates. | Particulates. Friction generates dust/flash. |
| Gap Bridging | Poor. Requires precise molding tolerances. | Good. Vibration helps melt flow to bridge gaps. |
| CapEx Cost | High ($50k–$300k+). | Moderate ($15k–$50k). |
| OpEx Cost | Low. No tool wear. Low energy. | Moderate. Horns/fixtures wear out. |
Troubleshooting Common Defects
Even with robust equipment, process drift occurs. Use this checklist for root cause analysis.
1. Burns or Charring
- Symptom: Black spots or bubbles in the weld seam.
- Root Cause:
- Air Gap: Lack of contact prevents heat transfer, causing the absorbing layer to overheat.
- Power Density: Laser power too high or scan speed too slow.
- Fix: Check fixture flatness and increase clamping pressure. Verify part tolerances.
2. Weak / Cold Welds
- Symptom: Parts separate easily; no material transfer.
- Root Cause:
- Transmission Loss: Top part has too much glass fill (>30%) or pigments blocking the beam.
- Laser Focus: The beam is focused incorrectly (too large a spot size reduces energy density).
- Fix: Switch to a higher power laser or reduce glass filler content.
3. Flash / Squeeze-Out
- Symptom: Molten plastic protruding from the edge.
- Root Cause: Excessive “collapse” distance (melt down).
- Fix: Adjust the collapse limit in the process monitor (e.g., limit collapse to 0.2 mm).
Cost Analysis: CapEx vs. OpEx
While the “sticker price” of a laser cell is higher, the ROI often justifies it for high-value production.
- CapEx (Initial Investment): A turnkey automated laser cell (Class 1 enclosure, robot/scanner, chiller) typically ranges from $80,000 to $250,000.
- OpEx (Running Costs):
- Consumables: Virtually zero. No ultrasonic horns to re-machine, no adhesives to buy.
- Yield: Laser welding often achieves >99% yield on complex electronics where ultrasonic vibration might damage 5% of units.
- Maintenance: Diode lifespans often exceed 20,000 hours.
The ROI Case: If you are welding 500,000 sensor housings/year, the elimination of scrap (saving $5/part on a damaged PCB) can pay for the laser system in under 6 months.
Safety and Compliance (ISO Standards)
Laser welding utilizes Class 4 laser sources (high power, invisible radiation), requiring strict safety adherence.
- ISO 11553-1: Specifies safety requirements for laser processing machines. Ensure your system integrator provides a Class 1 Enclosure (light-tight, interlocked doors) so operators do not need safety glasses during normal operation.
- ISO 15609-4: Standard for the specification and qualification of welding procedures for metallic materials (often adapted for high-spec plastic procedures in regulated industries).
Safety Notice: Never defeat safety interlocks. A reflection from a Class 4 laser can cause instant, permanent blindness.
Conclusion: Is Laser Welding Right for Your Application?
Laser plastic welding is not a universal replacement for all joining methods. If you are welding simple polypropylene tanks where flash is acceptable, hot plate welding is cheaper. However, if your product demands hermetic sealing, biocompatibility, or contains sensitive electronics, laser welding is likely the only viable engineering solution.
Next Steps for Implementation:
- Material Audit: Verify your polymers are compatible (Transmissive + Absorbing).
- Design for Manufacturing (DFM): Ensure your joint design allows for “melt collapse” (typically 0.1–0.3 mm).
- Feasibility Lab: Before buying equipment, send parts to a laser vendor for a weld trial.