Modern jewelry laser welders give you precise control for laser welding gold, silver, and platinum jewelry. These machines have transformed how jewelry is made and repaired, offering accuracy that traditional methods, like gas-fueled gold soldering, simply cannot match.
This guide will help you learn how to use a jewelry laser welder effectively, whether you are performing delicate repairs, working near heat-sensitive gemstones, or joining different metals. By understanding your machine and its capabilities, you can improve the quality and efficiency of your work.
We will also cover tested parameters for various metals, including 14k and 18k gold laser welding settings, so you can confidently adjust power, frequency, and pulse width for consistent, high-quality results. Take your time to follow each step and master this powerful technology.
Understanding Your Jewelry Laser Welder and Optimal Workspace Setup
Before you begin laser welding jewelry, it is crucial to understand your machine and prepare an efficient workspace. Familiarity with your specific jewelry laser welder, its components, and proper setup ensures safe and high-quality results.
Most jewelers use YAG or fiber laser welders. Proper placement, ventilation, and lighting improve precision and comfort. A stable surface, good ergonomics, and correct electrical connections are essential for optimal performance.
Once your workspace is prepared, you can move on to configuring your laser welding settings and using tested parameters for different metals, as detailed in the following sections.
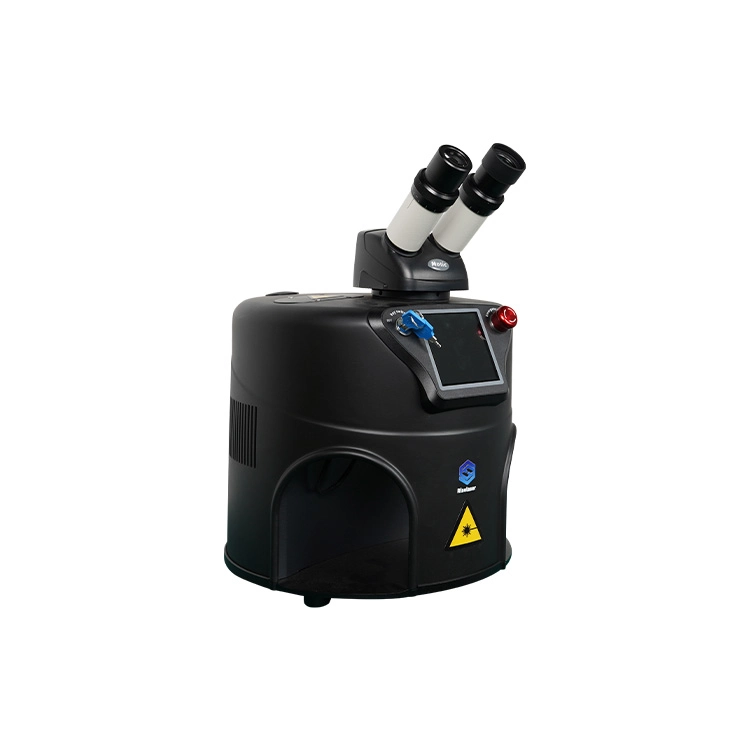
Familiarizing Yourself with Jewelry Laser Welders
Most common in the industry are YAG (Nd:YAG) laser welders. These are available as powerful standalone units or more compact desktop versions, sometimes referred to as a small welding machine for jewelry, suitable for smaller studios. Fiber lasers are also gaining traction due to their efficiency.
Essential Jewelry Laser Welder Components
Key components of any welder jewelry system include:
- The laser source (YAG crystal or fiber).
- A stable power supply.
- The optical system for focusing the beam.
- A viewing microscope with integrated safety filters.
- A work chamber, often equipped for argon gas shielding to protect the weld.
- A user-friendly control panel for parameter adjustment.
- A foot pedal for activating the laser.
- An efficient cooling system (water or air).
Optimizing Your Workspace Setup
Setting up a safe, optimized workspace is paramount.
- Location: Choose a stable, level surface with adequate space. Proper ventilation is critical.
- Safety: A dedicated fume extractor is highly recommended for operator safety.
- Lighting & Ergonomics: Good ambient and adjustable task lighting improves visibility. An adjustable chair and correct machine height prevent strain.
- Electrical: Ensure the welder connects to a dedicated, correctly grounded electrical circuit.
Initial Machine Calibration and Power-On
Initial machine calibration involves several steps:
- Pre-Power Checks: Verify all connections, cooling water levels (if applicable).
- Power-On: Follow the machine’s startup sequence.
- Alignment: Confirm beam alignment with the microscope crosshairs.
- Gas Flow: Check argon gas flow for proper shielding. This careful setup ensures your jewelry welding machine functions correctly and safely from the start.
Gold & Silver Laser Welding Settings for Jewelry
To achieve precise and consistent welds, it is essential to configure your jewelry laser welder according to the specific metal. Below are recommended starting parameters based on internal testing of YAG laser welders (60–100W). These settings cover common jewelry metals including gold, silver, and platinum, and are ideal for both delicate repairs and custom designs.
Recommended Settings for Common Metals
| Material | Power | Frequency | Pulsed Width | Beam Diameter | Remarks |
|---|---|---|---|---|---|
| K-white Gold | 15% | 10Hz | 1.5ms | 0.3–0.5mm | Reference only |
| K-Gold Gold | 20% | 10Hz | 2.0ms | 0.3–0.5mm | Reference only |
| Rose Gold | 26% | 10Hz | 2.0ms | 0.3–0.5mm | Reference only |
| Palladium Platinum | 22% | 10Hz | 2.2ms | 0.3–0.5mm | Reference only |
| Gold | 50% | 4.5Hz | 5.0ms | 0.7–0.3mm | Adjust by piece thickness |
| Silver | 55% | 3.5Hz | 6.0ms | 0.7–0.3mm | Adjust by piece thickness |
| Titanium Alloy | 12% | 10Hz | 1.8ms | 0.3–0.5mm | Reference only |
| Stainless Steel | 10% | 10Hz | 1.5ms | 0.3–0.5mm | Reference only |
Adjusting Parameters by Piece Thickness
Different jewelry pieces have varying thicknesses, which directly affects the heat input and weld quality. Thicker pieces require slightly higher power or longer pulse durations, while delicate or thin sections should use lower power and shorter pulses. Always start with a test weld on scrap material and adjust gradually for optimal results. Using the correct laser welding jewelry settings prevents overheating and preserves the integrity of the piece.
Practical Tips for Optimal Results
- Always perform a test weld on scrap material before working on the actual jewelry piece.
- Use the lowest effective power and shortest pulse when working near gemstones or delicate components.
- Keep the weld area clean; use high-purity argon for shielding to prevent oxidation.
- Adjust settings according to the metal type, karat, and thickness of each piece.
- Allow short cooling periods between welds to prevent heat damage.
- Observe the weld pool carefully; a clean, shiny, and well-fused pool indicates correct settings.
Preparing Jewelry and Materials for Laser Welding
Meticulous preparation of jewelry pieces and any additional materials directly impacts the final weld quality. This stage cannot be rushed.
Cleaning and Inspecting Jewelry Pieces
Surfaces for laser welding must be immaculately clean. Dirt, oils, or polishing compounds can cause porosity, poor fusion, or splatter.
- Initial Cleaning: Begin with ultrasonic cleaning or steam cleaning.
- Oxidation Removal: For heavy oxidation, chemical cleaning with a pickle (followed by thorough rinsing with distilled water) may be necessary.
- Final Surface Prep: The immediate weld area can benefit from a final cleaning with a fiberglass brush or fine abrasive to remove any lingering contaminants.
- Inspection: Carefully inspect the piece under magnification to identify the weld area, check for existing damage, and assess proximity to heat-sensitive elements.
Understanding Material Properties
Understanding how different metals react to the laser is key for successful welding.
- Gold: This highly reflective and thermally conductive metal requires careful parameter settings. Successful laser welding gold jewelry often involves specific techniques to manage these properties.
- Silver: As the most reflective and conductive metal, silver presents challenges but is weldable with practice. A modern laser jewellery welding machine truly shines here over older techniques.
- Platinum Group Metals: With high melting points and lower conductivity, these metals weld exceptionally well, creating clean, strong joints.
- Base Metals & Titanium: These have unique considerations, especially regarding oxidation. Excellent shielding is vital for materials like titanium.
Preparing Filler Wires and Consumables
Filler wire, typically matching the parent material in type and karat, is often used to add material or bridge gaps.
- Cleanliness: Ensure the wire is as clean as the workpiece.
- Diameter: Choose a diameter appropriate for the task; finer wires melt with less energy.
- Argon Gas: Use high-purity argon gas for shielding the weld pool from atmospheric contamination.
Properly Securing and Positioning Jewelry
Stable and precise positioning of the workpiece is crucial.
- Holding Methods: While hands (with finger cots) can hold pieces, non-magnetic tweezers, third-hand tools, or heat-resistant putty (like Thermogard) are invaluable for stability.
- Optimal Positioning: Ensure the weld joint is at the laser’s focal point and the argon gas nozzle effectively shields the weld zone.
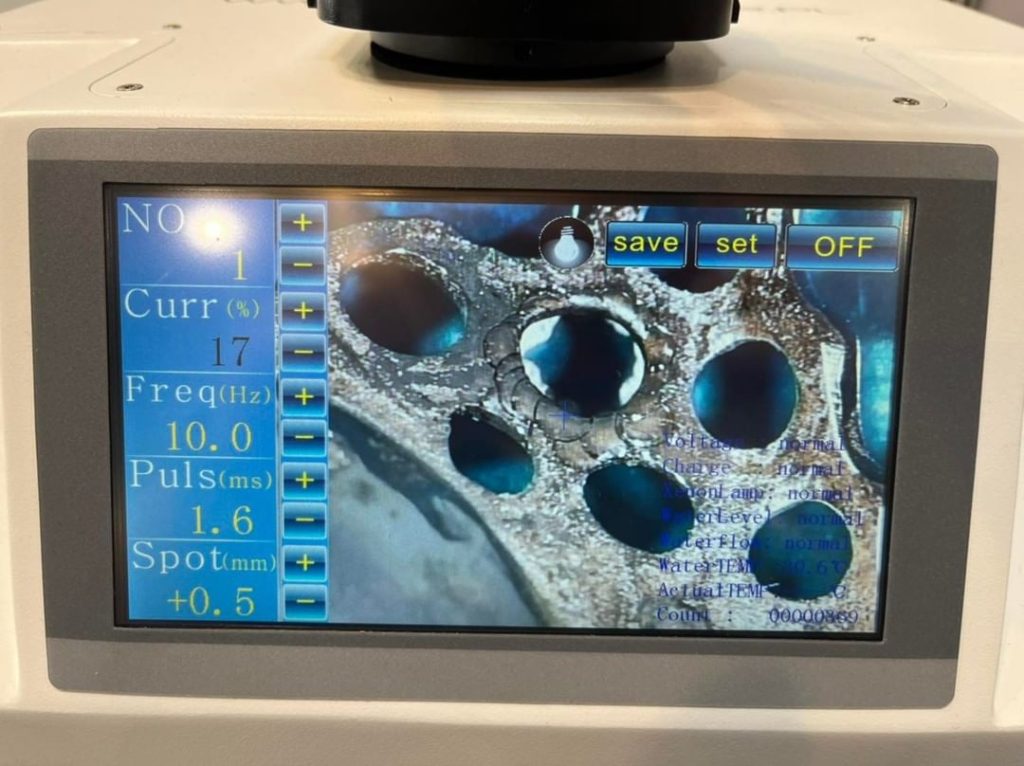
Configuring Laser Welder Settings for Optimal Results
Optimal results from your jewelry laser welding machine depend on the correct configuration of several interacting parameters. Fine-tuning these settings for each specific metal and task is essential.
Key Adjustable Parameters
Four core settings define the laser beam’s characteristics:
- Power (Voltage/Joules): This dictates the energy per pulse. Higher power suits deeper penetration, larger spot sizes, or higher melting point metals like platinum.
- Pulse Duration (Milliseconds – ms): This controls how long each individual laser pulse lasts. Longer durations yield larger, hotter weld pools. Shorter durations localize heat effectively, ideal for delicate work or near gemstones.
- Frequency (Hertz – Hz): This sets the number of laser pulses fired per second, relevant for seam welding. Higher frequency allows faster work but increases overall heat input.
- Spot Size (Microns – µm or Millimeters – mm): This is the diameter of the focused laser beam where it contacts the material. Smaller spots concentrate energy for fine, deep welds. Larger spots distribute energy for wider, shallower welds.
Parameter Guidelines for Common Jewelry Metals
While these are general starting points, always conduct test welds on scrap material. Exact values vary between laser welder models.
- Yellow Gold (14k-18k): Moderate power (e.g., 1.0-2.5 kW peak), pulse duration of 1.5-5.0 ms, and a spot size of 0.3-1.0 mm are typical.
- Silver (Sterling, Fine): Requires higher power (e.g., 2.0-4.0 kW peak) and often shorter, intense pulses (0.5-3.0 ms) due to its reflectivity and conductivity.
- Platinum (950 Pt): Needs high power (e.g., 1.8-3.5 kW peak) and moderate to long pulse durations (2.0-7.0 ms).
- White Gold: Similar to yellow gold, though some nickel alloys may require careful parameter selection to avoid cracking.
Creating, Saving, and Fine-Tuning Settings
Most modern machines allow saving parameter presets, enhancing consistency and efficiency for recurring tasks using your specific laser welding machine jewelry. Always fine-tune settings on scrap material identical to your workpiece. Observe the weld pool: a clean, shiny, well-fused pool indicates good parameters. Adjust one setting at a time to understand its effect.
Mastering the Jewelry Laser Welding Process
With preparations complete, mastering the actual welding process involves precision, understanding different techniques, and critically, managing heat.
Precise Alignment and Focusing of the Laser Beam
Accuracy depends on precise alignment and focus.
- Microscope & Crosshairs: Use the microscope’s crosshairs to target the exact weld spot.
- Optimal Focus: Adjust the Z-axis (height) to ensure the material surface is at the laser’s focal point. A sharp, crisp sound and a small, defined mark indicate correct focus.
Initial Tacking for Secure Points
Tacking creates small, temporary spot welds to hold components in alignment.
- Purpose: Prevents shifting, manages gaps, and reduces stress.
- Technique: Use lower power and shorter pulses. Place tacks strategically. Check alignment carefully; tacks can often be redone if needed. This step is vital for complex assemblies.
Executing Different Welding Techniques
Jewelry work requires various approaches:
- Spot Welding: Single laser pulses create discrete welds. This method is used for tacking or re-tipping prongs, making the machine a capable jewelry spot welder.
- Seam Welding: A series of overlapping pulses creates a continuous linear joint, ideal for sizing ring shanks or repairing cracks. Move the workpiece smoothly or use closely spaced individual spots.
- Fill Welding: Adding material, often with filler wire, builds up worn sections or fills larger gaps. Create a molten pool, introduce the wire, and fuse it with another pulse.
Managing Heat Input Near Delicate Components
Laser welding generates localized heat. Managing this is critical near heat-sensitive gemstones or delicate structures.
- Strategies: Use the lowest effective power, shortest practical pulse duration, and smallest spot size.
- Cooling: Weld in short bursts with cooling periods.
- Heat Sinks: Employ heat sinks like thermal putty, damp cotton (used cautiously), or brass tools to draw heat away from sensitive areas. Direct the laser away from stones.
Post-Weld Inspection, Cleaning, and Finishing
The laser work is done, but the job requires careful post-weld attention to ensure quality and aesthetics.
Visual Inspection for Weld Quality
Once the piece has cooled, conduct a critical visual inspection, ideally under magnification.
- Check For: Complete fusion, adequate fill (if wire was used), smooth surface appearance, absence of porosity (pinholes), cracks, or undercutting.
- Nearby Components: Re-confirm no heat damage to adjacent gemstones or features. If significant defects are found, the area may need re-welding.
Testing Weld Strength (Use Caution)
For most jewelry repairs, visual inspection by an experienced welder is primary. Destructive tests are for scrap practice pieces. On an actual piece, a very gentle probe might check basic adhesion on robust joints, but extreme caution is necessary.
Cleaning and Removing Discoloration
Slight discoloration or microscopic spatter can occur.
- Methods: A fine fiberglass scratch brush, an ultrasonic cleaner with jewelry solution, or a steam cleaner can remove minor debris.
- Stubborn Discoloration: For more resistant oxides (especially on silver), very fine abrasives or, cautiously (if stones are not vulnerable), a pickling solution might be used.
Polishing and Finishing the Welded Area
The final step is seamlessly blending the weld.
- Leveling: If the weld bead is raised, carefully level it with fine files or abrasives.
- Pre-Polishing: Use progressively finer abrasives to remove scratches.
- Final Polishing: Use a polishing motor with appropriate buffs and compounds (e.g., rouge for gold) to achieve the desired luster.
- Texture Matching: If the original piece had a texture, replicate it carefully.
- Final Clean: Thoroughly clean all polishing compounds using an ultrasonic cleaner and steamer.
Essential Safety Practices and Routine Machine Maintenance
Operating any laser welder, including a specialized jewel welding machine, demands strict adherence to safety protocols and regular upkeep for longevity and performance.
Mandatory Personal Protective Equipment (PPE)
Jewelry laser welders are typically Class 4 lasers, posing risks of severe eye injury and skin burns.
- Eye Protection: The welder’s integrated microscope safety filter is critical. Ensure it’s intact. Anyone else nearby needs laser safety glasses rated for your laser’s wavelength (e.g., 1064 nm for Nd:YAG).
- Skin Protection: Non-flammable gloves and long sleeves offer added protection.
- Respiratory Protection: Always operate the fume extraction system.
Understanding Laser Safety Classifications and Precautions
- Class 4 Hazard: High power; direct beam and reflections are hazardous. Can be a fire risk.
- Precautions: Only trained personnel should operate. Use in a controlled area with warning signs. Keep the beam path contained. Do not bypass safety interlocks. Always consult your machine’s manual.
Routine Machine Maintenance
Regular maintenance is vital for consistent performance.
- Optics Cleaning: Clean the protective lens shield daily or as needed with manufacturer-recommended supplies. Dirty optics reduce power and weld quality.
- Water Cooling System (if applicable): Regularly check water levels and quality. Change water and filters as per schedule.
- Air Filters: Clean or replace air intake filters.
- Gas Supply: Monitor argon gas levels.
- General Upkeep: Keep the machine clean. Check connections. Note unusual noises.
- Flashlamp Replacement (YAG lasers): Replace per manufacturer’s recommendations.
- Logbook: Track all maintenance.
Recognizing and Troubleshooting Common Issues
Address problems methodically:
- Splattering: Caused by contaminants, incorrect (too hot) parameters, or poor shielding. Improve cleaning, adjust settings, check argon.
- Incomplete Fusion/Weak Welds: Due to insufficient power/pulse, poor focus, or oxidized surfaces. Increase energy, check focus, clean surfaces.
- Porosity: From contamination, poor shielding, or excessive heat. Improve cleaning/shielding, adjust parameters.
- Gemstone Damage: Excess heat. Use heat management techniques, lower/shorter parameters.
- No Laser Fire: Check pedal, interlocks, optics, lamp, cooling system. Consult a technician if basic checks fail.
Exploring Advanced Laser Welding Applications in Jewelry
Mastering fundamentals opens doors to intricate repairs, restoration, and creative designs beyond basic tasks.
Precision Repair and Antique Restoration Techniques
Laser welding excels with delicate and valuable pieces.
- Heat-Sensitive Materials: Safely work near fragile gemstones (pearls, opals, emeralds), enamel, or intricate filigree without damage from excessive heat.
- Antique Specifics: Preserve original metal and patina. Rebuild worn details with minimal intervention. The aim is an invisible, strong repair.
Successfully Joining Mixed Metals
Laser welding enables joining dissimilar metals often impossible to solder.
- Combinations: Gold to platinum, or precious metals to stainless steel or titanium (with excellent shielding).
- Considerations: Requires careful parameter development. Filler wire choice and metallurgical compatibility are important.
Utilizing the Laser for Micro-Detailing (Beyond Joining)
The laser’s fine control can be adapted for surface work.
- Surface Texturing: Create stippled or frosted effects with controlled low-power pulses.
- Micro-Marking (Limited): Shallow, simple marks or initials are sometimes possible, but this is not true engraving. Dedicated engraving systems are superior for detailed work.
Creative Applications and Pushing Design Boundaries
Laser welding frees jewelers from many traditional constraints.
- Complex Assemblies: Construct intricate designs with delicate components.
- Innovative Settings: Secure gemstones in unconventional ways.
- “Impossible” Connections: Join components at angles or locations inaccessible to traditional tools.
- Rapid Prototyping: Quickly assemble and modify custom pieces.
By embracing these techniques and safety protocols, your jewelry laser welder will become an invaluable asset.
Conclusion: Advancing Your Craft with Jewelry Laser Welding Expertise
Using a jewelry laser welder can greatly improve your skills, enabling detailed repairs, careful restorations, and creative designs that were previously difficult to achieve. When you learn how to set up the machine, weld properly, stay safe, and finish well, the laser welder becomes like an extension of your hand.
All parameter settings and practical tips in this guide are based on extensive testing conducted by Riselaser engineers, using real-world jewelry pieces. This ensures that the recommendations are reliable, tested across various metals, and applicable for professional jewelers and studios seeking consistent, high-quality results.
By following these tested procedures, you can confidently bring complex ideas to life and offer superior repair and customization services. Continuous practice and adherence to the guidelines will help you become truly skilled with this powerful technology.
FAQs
A jewelry laser welder allows precise control for delicate repairs, joining different metals, and working near gemstones without heat damage. Welds are cleaner, require less finishing, and enable complex repairs impossible with soldering.
Yes, modern machines handle gold, silver, platinum, and some base metals. 14k and 18k gold require moderate power and pulse settings, while silver may need higher power and shorter pulses due to its conductivity.
Refer to tested settings for each metal (power, frequency, pulse width, beam diameter). Always start with a test weld on scrap material and adjust gradually for the thickness and design of your piece.
Use the lowest effective power, shortest pulse, and smallest spot size. Apply argon shielding, and allow short cooling periods between welds to manage heat.
Clean optics regularly, check water cooling if applicable, monitor argon gas levels, and follow manufacturer schedules for lamp/flashlamp replacement. A clean workspace and routine maintenance ensure consistent weld quality.
