
Laser welding defects usually include porosity, cracking, spatter, undercut, and distortion. In most cases, these problems are caused by surface contamination, unstable keyhole behavior, incorrect shielding gas, poor joint fit-up, or mismatched laser power and travel speed. This guide explains the most common laser welding defects, what causes them, and how to prevent them in real production.
At Riselaser, our application engineers have tested a wide range of materials, from 6xxx series aluminum to highly reflective copper and galvanized steel. Based on our sample testing experience, defect control is rarely about one setting alone. It usually comes down to finding a stable process window for the material, thickness, fit-up, shielding gas, and beam behavior.
Laser Welding Defects at a Glance
Before adjusting laser power or welding speed, it helps to identify the defect correctly. Different laser welding defects may look similar at first, but their root causes are often different. The table below gives a quick overview of the most common problems, their typical causes, and the first settings or conditions you should check.
| Defect | What it looks like | Common causes | What to check first |
|---|---|---|---|
| Porosity | Small holes or gas pockets inside or on the weld | Oil, grease, moisture, oxides, unstable keyhole, poor shielding gas coverage | Surface cleaning, gas flow rate, welding speed, power stability |
| Cracking | Fractures in or near the weld after or during solidification | High thermal stress, crack-sensitive alloys, poor filler selection, fast cooling | Base material, filler wire, heat input, preheating need |
| Spatter | Molten droplets ejected around the weld seam | Excessive power density, contamination, unstable keyhole, improper parameters | Laser power, spot size, travel speed, surface condition |
| Undercut | A groove along the weld toe that is not filled | Speed too fast, heat input imbalance, poor fit-up, excessive weld pool fluidity | Joint gap, welding speed, power level, beam behavior |
| Distortion | Part warping or dimensional change after welding | Excess heat input, poor clamping, thin material, uneven thermal distribution | Clamping method, heat input, welding path, part thickness |
Each defect needs a different correction strategy. In the following sections, we explain the most common laser welding defects one by one, including their causes, prevention methods, and practical troubleshooting ideas for real production. For an independent technical summary of common laser weld problems, see TWI’s overview of typical defects in laser welds.
Porosity in Laser Welding: Causes, Prevention, and Troubleshooting
Porosity is one of the most common laser welding defects. It appears as small gas pockets trapped inside the weld metal or on the weld surface. These voids reduce weld density and mechanical strength. In sealed parts, they can also create leak paths and lead to product failure.
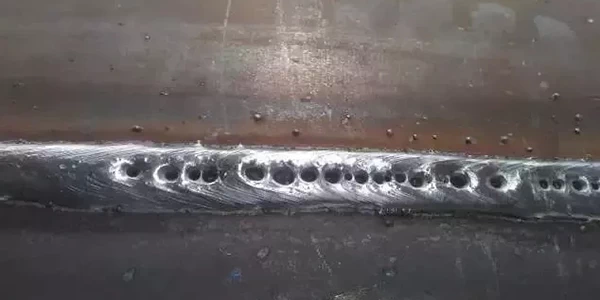
What does porosity look like in laser welding?
Porosity forms when gas becomes trapped in the molten weld pool and cannot escape before the metal solidifies. In laser welding, the most common causes are:
Surface contamination
Oil, grease, moisture, oxides, and coatings can vaporize under the laser beam and release gas into the weld pool.
Incorrect shielding gas settings
If the shielding gas flow is too low, protection is not sufficient. If it is too high, turbulence can pull air into the weld area.
Keyhole instability
In deep penetration laser welding, an unstable keyhole can collapse and trap gas inside the weld.
Coated materials
Materials such as galvanized steel are more likely to develop porosity because the coating can vaporize before the base metal fully melts.
What should you check first if you see porosity?
If porosity appears during laser welding, check these items first:
- Surface cleanliness before welding
- Shielding gas type and flow rate
- Laser power and welding speed balance
- Focus position and weld stability
- Material coating, oxide layer, or moisture on the joint
- Joint fit-up and consistency along the seam
How to reduce porosity in laser welding
To reduce porosity, keep the weld pool clean and stable long enough for gas to escape before solidification.
- Clean the surface thoroughly to remove oil, grease, moisture, rust, and oxides.
- Optimize shielding gas flow to maintain stable coverage without turbulence.
- Stabilize the process window by adjusting laser power, travel speed, and focus.
- Match the process to the material, especially for coated or difficult metals.
Practical note: porosity in galvanized steel
Galvanized steel is a common source of porosity in laser welding because the zinc coating vaporizes at a much lower temperature than steel. This creates extra gas pressure in the weld zone. In our sample testing, simply reducing welding speed was not enough. Better results came from using a wobble welding pattern together with stable nitrogen shielding gas control. In one recent test with a 1500W handheld laser welder, a wobble width of 1.5 mm and nitrogen flow of 15 L/min greatly reduced porosity.
Cracking in Laser Welding: Causes, Prevention, and Troubleshooting
Cracking is one of the most serious laser welding defects because it directly weakens the joint and can lead to failure in service. In most critical applications, cracks are considered unacceptable. They may form during solidification or after the weld has cooled.
What causes cracking in laser welding?
Cracking usually happens when the weld metal or the heat-affected zone cannot withstand the stresses created during heating and cooling. In laser welding, the most common causes are:
Crack-sensitive materials
Some materials are more likely to crack than others. Aluminum alloys such as the 6xxx series are well known for hot cracking sensitivity. In steels, impurities such as sulfur and phosphorus can also increase cracking risk.
High thermal stress
Laser welding produces rapid heating and cooling. This creates strong shrinkage forces in and around the weld. If the material cannot absorb these stresses, cracks may form.
Deep and narrow weld shape
A typical laser weld often has a deep, narrow profile. This shape can concentrate stress along the weld centerline and make cracking more likely.
Unmatched filler or process setup
When welding crack-sensitive alloys, the wrong filler choice or an unstable process window can make solidification cracking worse.
What should you check first if you see cracking?
If cracking appears during or after laser welding, check these items first:
- Base material type and alloy series
- Impurity level or coating condition
- Filler wire selection, if filler is used
- Laser power and welding speed balance
- Cooling rate and preheating need
- Weld shape, penetration depth, and joint restraint
How to reduce cracking in laser welding
To reduce cracking, the goal is to lower thermal stress and make the weld metal less sensitive during solidification.
- Choose suitable base materials and filler wire for crack-sensitive alloys.
- Reduce thermal stress by using preheating when needed.
- Optimize laser power and speed to avoid an overly deep, narrow, highly restrained weld profile.
- Improve joint design and fit-up so stress is distributed more evenly.
- Control the cooling rate to reduce shrinkage stress in the weld area.
Practical note: cracking in aluminum laser welding
Hot cracking is a common concern when welding aluminum alloys, especially 6xxx series materials. These alloys have a relatively wide solidification range, which makes them more sensitive to cracking during cooling. In practice, reducing cracking often requires more than a simple power adjustment. Better results usually come from combining proper filler selection, lower thermal stress, and a more stable process window.
Why cracking matters
Cracking is not a cosmetic issue. Even a small crack can seriously reduce weld reliability, especially in structural, pressure-tight, or fatigue-loaded parts. For this reason, cracking should be treated as a root-cause problem in material selection and process control, not just as a surface defect found during inspection.
3. Spatter: The Ejected Droplets That Signal Instability
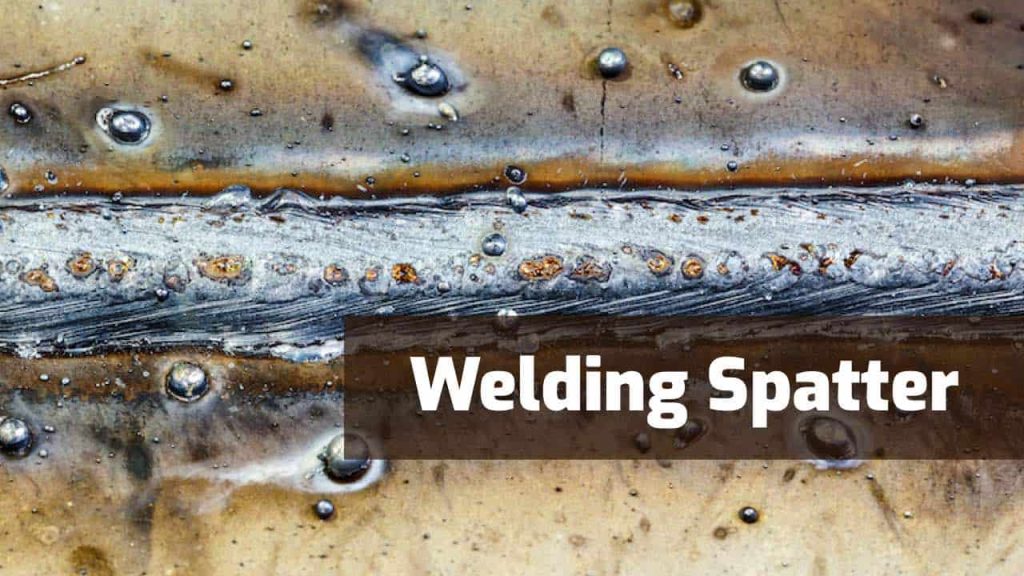
What is Spatter?
Spatter refers to the small droplets of molten metal that are ejected from the weld pool during the welding process. These droplets can land on the workpiece, creating a poor surface finish, or damage sensitive laser optics.
What Causes Spatter?
Spatter is a symptom of an unstable and overly energetic process. The main causes are:
- Excessive Power Density: This is the most common cause. If the laser power is too high, it can cause the metal to boil violently, expelling molten droplets.
- Surface Contaminants: The rapid vaporization of oils, moisture, or coatings (like the zinc on galvanized steel) can create an explosive expansion of gas that ejects spatter.
- Keyhole Instability: Fluctuations within the keyhole can also lead to the ejection of molten material.
How to Prevent Spatter
- Reduce Power Density: Lower the laser power or increase the beam’s spot size to achieve stable melting instead of violent boiling.
- Ensure Clean Surfaces: Thoroughly clean all materials before welding to eliminate contaminants that can cause explosive gas generation.
- Optimize Parameters: Adjusting the welding speed and shielding gas flow can help stabilize the process and control the behavior of the molten pool.
Spatter in Laser Welding: Causes, Prevention, and Troubleshooting
Spatter in laser welding refers to small droplets of molten metal that are ejected from the weld pool during the process. Heavy spatter can reduce surface quality, increase post-weld cleanup, and in some cases damage surrounding parts or sensitive optics.
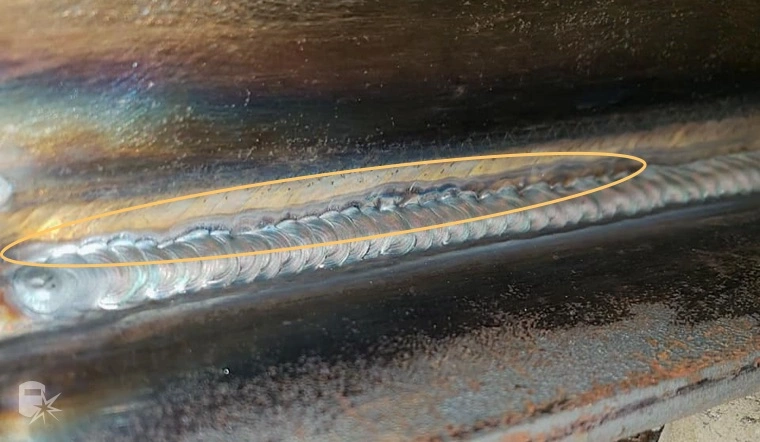
What causes spatter in laser welding?
Spatter is usually a sign that the welding process is too energetic or unstable. In laser welding, the most common causes are:
Excessive power density
If the laser power is too high, or the energy is too concentrated, the metal can boil violently and eject molten droplets from the weld pool.
Surface contamination
Oil, moisture, rust, oxides, and coatings can vaporize quickly under the laser beam. This sudden gas expansion can push molten metal out of the weld zone.
Keyhole instability
When the keyhole fluctuates or collapses, the molten pool becomes unstable and spatter is more likely to occur.
Improper process balance
Poor matching between laser power, travel speed, focus position, and shielding gas can make the weld pool unstable and increase spatter.
What should you check first if you see spatter?
If spatter appears during laser welding, check these items first:
- Laser power level and energy density
- Beam spot size and focus position
- Welding speed and process stability
- Surface cleanliness before welding
- Coatings, moisture, or oxide layers on the material
- Shielding gas flow and nozzle setup
How to reduce spatter in laser welding
To reduce spatter, the goal is to create stable melting instead of violent boiling or unstable keyhole behavior.
- Reduce power density by lowering laser power or increasing the beam spot size when needed.
- Clean the material surface thoroughly to remove oil, moisture, oxides, and coatings that can create explosive gas release.
- Optimize welding speed and gas flow so the weld pool remains stable.
- Adjust focus and beam behavior to avoid an overly concentrated or unstable process.
- Match the setup to the material, especially when welding reflective or coated metals.
Practical note: spatter control in reflective materials
In some cases, spatter is not only caused by incorrect parameters, but also by beam behavior and process limitations. When welding highly reflective materials such as aluminum, a more even heat input can help reduce violent boiling and improve weld stability. In these situations, using adjustable beam modes or a wobble welding head may help lower spatter and create a more controlled weld pool.
Undercut in Laser Welding: Causes, Prevention, and Troubleshooting
Undercut in laser welding is a groove formed along the edge of the weld that is not fully filled with weld metal. This defect reduces the effective section of the joint and creates a stress concentration point. In parts exposed to vibration or cyclic loading, undercut can significantly reduce fatigue performance.
What causes undercut in laser welding?
Undercut usually happens when the weld pool does not flow and fill the weld toe properly before solidification. In laser welding, the most common causes are:
Welding speed is too fast
If the travel speed is too high, the molten metal may not have enough time to spread to the weld edges before it solidifies.
Heat input is too high
If laser power is too high, or the weld pool becomes too large and fluid, the molten metal can sag and leave the weld edge unfilled.
Poor joint fit-up
Large gaps or inconsistent fit-up reduce the amount of material available to form a complete weld profile and make undercut more likely.
Unstable process balance
If power, speed, focus, and joint condition are not matched correctly, the weld pool becomes harder to control and undercut can appear more easily.
What should you check first if you see undercut?
If undercut appears during laser welding, check these items first:
- Welding speed and heat input balance
- Laser power level and energy density
- Joint gap and fit-up consistency
- Weld pool size and stability
- Focus position and beam behavior
- Material thickness and edge condition
How to reduce undercut in laser welding
To reduce undercut, the goal is to maintain a stable weld pool that fully wets and fills the weld edges.
- Balance laser power and welding speed so the weld pool is neither too small nor too fluid.
- Reduce excessive energy density if the weld pool is sagging or becoming unstable.
- Improve joint fit-up to minimize gaps and keep the seam consistent.
- Stabilize the process window by checking focus position, weld pool behavior, and travel consistency.
- Match the setup to the part geometry so the weld can form a complete profile along the joint edge.
Practical note: undercut is not always caused by high speed alone
Undercut is often treated as a simple “speed too fast” problem, but in practice it can also happen when the heat input is too high and the weld pool becomes too fluid. This is why undercut should be evaluated as a process balance issue, not as a single-parameter problem. In laser welding, both insufficient edge fill and excessive weld pool sagging can lead to the same visible defect.
Weld Inspection and Monitoring in Laser Welding
Preventing laser welding defects does not depend on parameters alone. It also requires the right inspection and monitoring methods. In practice, defect control usually has two parts: real-time process monitoring during welding and post-weld inspection after welding. The first helps detect instability early. The second confirms whether the finished weld meets quality requirements.
Why weld inspection matters in laser welding
Laser welding can produce defects such as porosity, cracking, lack of fusion, spatter-related instability, and undercut. Some of these problems are visible on the surface, but others remain hidden inside the weld. For this reason, visual appearance alone is not always enough. A reliable quality process should combine real-time monitoring with suitable inspection after welding.
In-process monitoring for real-time control
In-process monitoring helps detect welding deviations as they happen. This makes it possible to correct unstable conditions earlier and improve consistency in production.
Optical monitoring
Optical systems use photodiodes or thermal sensors to track signals from the weld pool. Changes in emitted light can indicate process instability, spatter, or loss of penetration.
Acoustic monitoring
Acoustic monitoring analyzes the sound generated during welding. Changes in the sound pattern can be linked to keyhole instability or cracking events.
Post-weld inspection for final quality verification
Post-weld inspection is used to confirm weld quality after the process is complete. The right method depends on whether you need to detect surface defects, internal porosity, or planar flaws such as cracks.
Visual testing (VT)
VT is the most basic inspection method. It is useful for checking surface defects such as visible cracks, undercut, and weld shape issues.
Radiographic testing (X-ray/CT)
X-ray inspection is highly effective for detecting internal defects such as porosity. CT goes further by providing a more detailed internal view of the weld.
Ultrasonic testing (UT)
UT uses high-frequency sound waves to detect internal flaws. It is especially useful for planar defects such as cracks and lack of fusion.
How to choose the right inspection method
The best inspection method depends on the defect type and the quality requirement.
- Use VT for visible surface defects and basic weld profile checks.
- Use X-ray or CT when internal porosity is a key concern.
- Use UT when crack detection or lack of fusion is the main focus.
- Use in-process monitoring when stable production and early defect detection are more important than final pass/fail checks alone.
Practical note: monitoring does not replace process control
Inspection can help identify defects, but it does not replace a stable process window. The best long-term results still come from proper surface preparation, stable parameters, good fit-up, and material-specific process control. Monitoring and inspection should support defect prevention, not only defect detection.
Conclusion: From Defect Detection to Defect Prevention
High-quality laser welding is not only about correcting visible defects after the weld is finished. The real goal is to build a stable process that prevents porosity, cracking, spatter, undercut, and other weld quality problems before they appear.
In practice, defect prevention depends on several factors working together: clean material surfaces, proper joint fit-up, stable laser parameters, suitable shielding gas, and a process window that matches the material and application. Inspection and monitoring also play an important role, but they work best when they support a well-controlled welding process rather than compensate for an unstable one.
If you are facing repeated laser welding defects in production, the best approach is to identify the root cause early and adjust the process systematically. In many cases, small changes in preparation, parameter balance, or beam behavior can make a major difference in weld consistency and final part quality.
Frequently Asked Questions (FAQ)
Porosity is one of the most common laser welding defects, especially when the material surface is contaminated or the shielding gas setup is unstable. Hot cracking is also a major concern in crack-sensitive alloys such as 6xxx series aluminum.
Porosity usually happens when gas becomes trapped in the molten weld pool before the metal solidifies. Common causes include oil, grease, moisture, oxides, coatings, poor shielding gas control, and unstable keyhole behavior.
Spatter is usually a sign that the welding process is too energetic or unstable. The most common causes are excessive power density, surface contamination, and keyhole instability. In some cases, poor balance between laser power, speed, focus, and gas flow can also increase spatter.
Welding speed has a strong effect on weld quality. If the speed is too fast, the molten metal may not fully fill the joint, which can lead to undercut. If the speed is too slow, the weld pool can become too large and unstable, which may also cause defects. The correct speed depends on material, thickness, joint fit-up, and laser power.
Some surface-related or geometric defects may be corrected by rework if the application standard allows it. However, critical defects such as cracks often mean the weld should not be accepted. In most cases, preventing defects through stable process control is more reliable and more cost-effective than repair.